Iron-On Patch Instructions
You just received your snazzy Winks For Days patch, removed it from its packaging, and are dying to attach it that gucci bag. As excited as we are for you, let's drop some knowledge first.
All of our patches come with iron-on backing, which our embroiderer adamantly refers to as heat seal. Heat seal doesn't go well with nylon or other synthetic fabrics. So if you're throwing a patch party, be sure and invite only your denim and cotton garments.
Oh, it's an all-inclusive party? Then BYOG (bring your own glue)! We recommend E6000 Craft Adhesive. She's a waterproof rubber-based compound that withstands washing and drying. It's our favorite method of attachment and works on everything from fabric, ceramics, wood, glass, and metal... if you're into applying it to inanimate objects, like your phone case or public bathroom stall.
If you're a patch aficionado, then you probably already know you can sew your patch on. You can also try to combine sewing the edges of your patch with either ironing or glueing. The ultimate when going for that full send permanent bond.
Please follow our comprehensive step-by-step guide below for applying your iron-on patches. You got this!
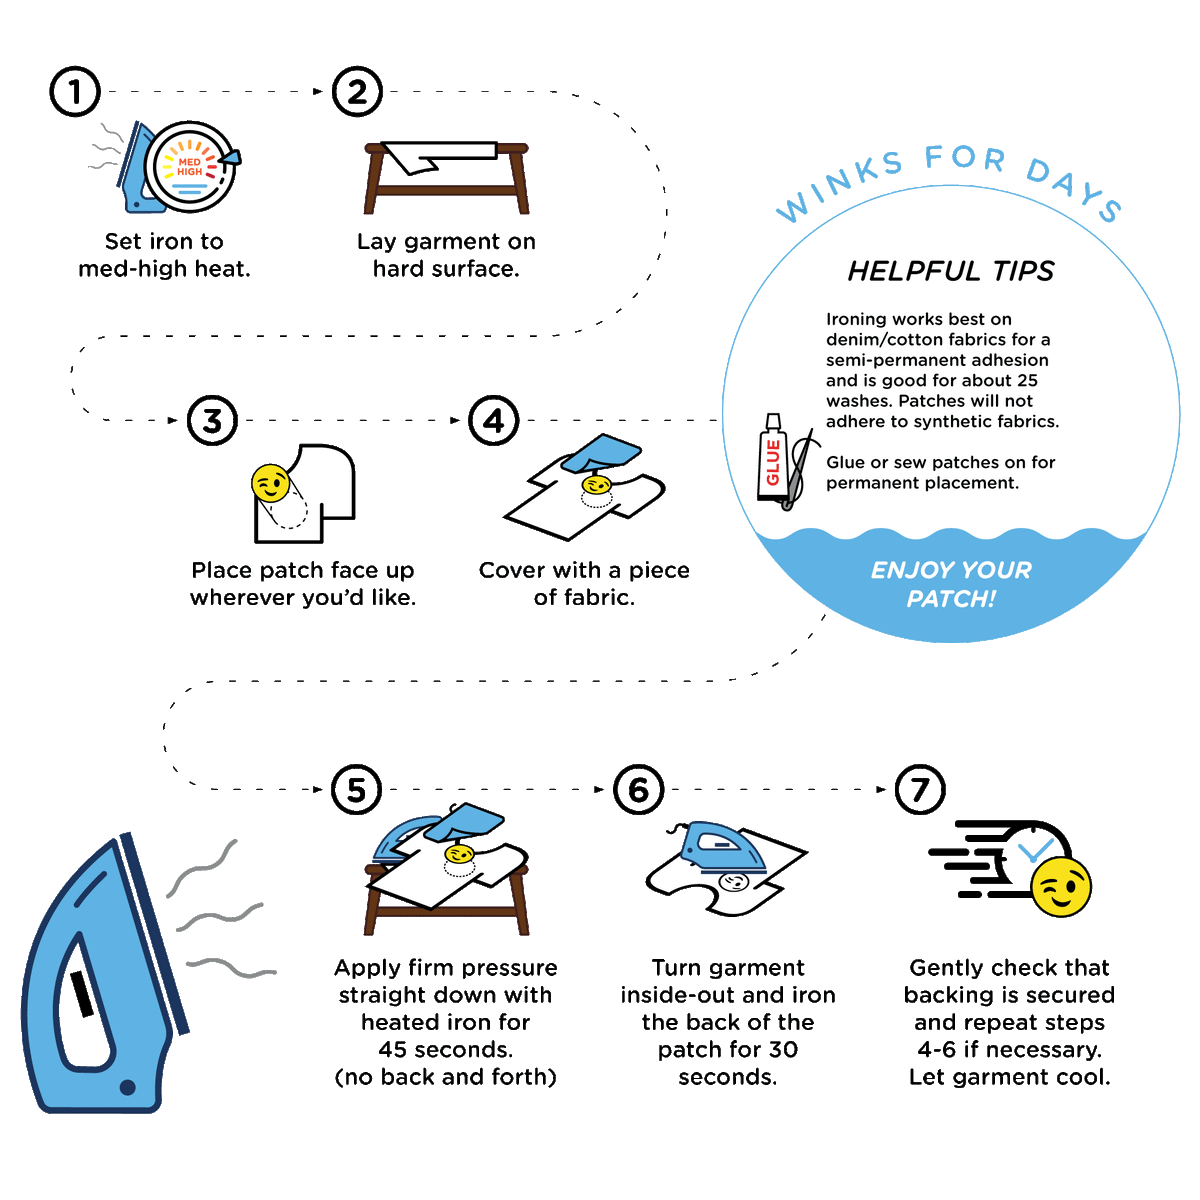
IRON-ON PATCH INSTRUCTIONS
- Preheat your iron: Set your iron to a medium to high heat setting.
- Prepare the garment: Ensure that the garment or fabric item you plan to attach the patch to is clean and free from wrinkles. Lay it flat on a hard, sturdy, and heat-resistant surface.
- Position the patch: Place the embroidered iron-on patch face up wherever you'd like.
- Protect the patch: Place a thin cloth or cotton fabric on top of the patch before ironing. This prevents direct contact between the iron and the embroidered surface.
- Apply heat: Place the hot iron on top of the patch, directly over the design. Apply firm, even pressure without moving the iron around. Hold it in place for about 45 seconds.
- Apply heat to the back: Turn garment inside-out and place the hot iron on the back of the patch, directly over the design, for about 30 seconds.
- Check the adhesion: Carefully lift the corner of the patch to see if it adhered to the fabric. If the patch lifts off, place it back down and reapply heat for a few more seconds until it firmly sticks.
- Allow to set: Let the patch and garment to cool down for a few minutes. Avoid touching the patch while it's still warm, as it may not have fully bonded to the fabric yet. It's generally recommended to wait at least 24 hours before washing to ensure maximum durability.
Note: If you've followed the above steps and your patch is still not sticking, it might be worth considering alternative attachment methods such as sewing or using fabric glue.
Please contact us at hello@winksfordays.com with any questions.